Saturday, May 18, 2013

More work has been done over the past couple of months.  Another 15 locos have been speed matched.  Some ballasting of parts of the yard and general bug fixes from running the layout.

Jim came over from Adelaide and tweaked the Digitrax PM42's to trip earlier than the Zephyr.  Now the 8 blocks work as they should during a track short circuit.  

While Jim was here we removed the switching layout from the back room.  Seven years ago, I carried the 7' long board into the house on my own.  We both struggled to get it back into the garage!  I felt somewhat enfeebled.  Maybe we had too much red the night before?

The test track now needed to be made stand alone, as it was hinged to the switching layout.  I used 1" aluminium square tube and new joiners from Bunnings hardware.  I noticed that the joiners are much harder and have less give (I broke one removing it from the tube) than those from Capral Aluminium.  The tube also seems to be fractionally smaller internal than Capral.  This meant belting the daylights out of the joiners to get them home.
 
 The end result.  The board flips over the test layout to protect the track.

 Overall view of the test track using Kato Unitrack.  Note the double row of brass hinges to allow the side to fold up and cover the track.


Jim and I did a bit of running (not the physical stuff!) on the layout.  We both enjoyed a couple of hours and then needed to open another bottle of red.

I bought a Digitrax stationary sound decoder.  I wanted to replace the GP 38 with a U boat sound.  That killed a few hours.  What should have been straightforward, proved to be a challenge and the GP 38 was gone, but we couldn't get a peep out of the decoder.  Many re-installs did not solve the problem.  It turned out that we had a dud CV number.  The answer was in the manual, but we overlooked that line.  That was one day gone and we celebrated with some red.  That was good, so we had some more.  A MUCH slower day the next day.....ooooh.
Jim hard at work relieving me of some red before it goes off.

Jim looking pleased at being able to help.  Thanks for your help.


Sunday, July 1, 2012

Firstly, sorry to the followers for not being more attentive to the blog.  My wife has Alzheimers and it has been getting worse this year.  Work on the layout has ground to a halt.  One of the big 'show stoppers' is how soon or far, additional care will be needed.  It is very hard to maintain motivation if we have to move into some sort of retirement / aged care village and the layout will need to be trashed.

I did some revised speed matching of locos.  I did have the coal drags with a max of 35 mph, but that was a bit too slow.  I bought them in and reset the top speed to 55 mph.  The result was not what I expected - because - I used the wrong marker for timing the 4 foot distance.  It was hidden by the notebook screen.  I did all the speeds at 3 feet not 4 feet.  The locos all ran 25% faster than I wanted.

 The black screw on the left is the start/end point (white paint on the ballast), the other marker is out of sight.

 When I close the notebook the start/end point furthest away is marked by the blue pen


I didn't want to make the same mistake again, the old notebook gets the 'blue screen of death' every now and then, so I bought an el cheapo notebook with an 11" screen, then I can see all the markers on the test track.
I can see both start/end points with the smaller screen.  There's even a ghost in the notebook taking my picture!


  The old notebook has a 15.6" screen and is just a bit too big.  But it runs XP.  DecoderPro runs sweetly on XP.  The new notebook runs W7.  DecoderPro doesn't do a simple load up and run.  It opens up OK, but I can't access my roster of locos and settings.  The data is there, it just wont be read by DecoderPro.  I think Malcolm Fraser was right "life wasn't meant to be easy".

I need to sit down and do some more work on getting the roster available to the new notebook.  I may even get to do that today.

Happy modelling,
Peter

Friday, April 20, 2012

You may have noticed my deliberate mistake?

14. 8' doesn't = 84".  You knew that.  8' = 96" = 2:96 or 1:48  = 2.1%.

Measure twice, cut once.  I told you I wasn't a good carpenter!
You may have wondered what my layout construction rules were and where they came from.  Just in case you weren't wondering, it's here anyway :-)  They are adapted from an old Model Railroader article.  When I get time I will search through the mountain of mags.


1. I know when & where my railroad is located.  I guess we all like a range of locos and rolling stock that spans a time period that exceeds the 'ideal' ie modelling depending on your preferences - January 27th 1965, Spring 1965, or 1965.  I sort of care about 1970 to 1990, around Virginia, USA.  That sort of nails things down to what I can be happy with.  It means that I can run pre-Conrail locos and Conrail locos, if I choose to do so.  I like -7's and -8's.  I apparently like SD60's because I seem to have bought heaps of them!  That's more a fault of buying before the layout is built and not really keeping track of what I have.

2. Trains will be going from A to B.  For the coal, it has a start and end point.  They just happen to also be a point for loads out and empties in, or visa versa, depending upon which side of the scenery divider you face.  A wild imagination is needed here as the divider is not yet installed.

3. The railroad goes beyond the layout.  Fitzy's Staging is my off layout to anywhere not 'on' the layout.

4. Every track has a purpose.  I tried hard not to have a layout full of track and nothing else.  Sometimes there is an urge to just put another bit of track into the empty space.


5. I made a list of the trains that will run.  An empty coal, a full coal,  maybe an unloading coal, a pass, an express freight, a way freight, a TOFC, a roadrailer - I've run out of track.  Fitzy's Staging means that I can have 4 short trains 'off layout'.  They can run interference with the unit coal trains.

6. Curves are at least 500mm.  Most curves exceed 500mm radius.  It is in yard entry or exit that smaller radii are used.

7. Turnouts do not require reaching across the main.  Achieved except for entry or exit from Fitzy's Staging. I'm not a magician. 

8. Aisles are wide enough.  This was important to me.  I have been to layouts where there is only room for 5' tall waifs to pass each other. 


9. Car uncoupling is within easy reach.  That is reasonable, but it can be difficult if I try uncoupling from a yard track with a few trains in between me and the couplers.  I could have ditched some yard tracks, but a yard should look at least a little like a yard.

10. Tracks not parallel to the edges.  I have tried to avoid this, but the main yard ended up that way.  I am comfortable with that.


11. I’ve considered layout height.  Like I said in the last post (it's Anzac Day next week, I mean previous post), I was either too tall, too short and about the right height.

12. There is sufficient vertical clearance between tracks.   I can run double stacks if I decide to ditch other trains.


13. I have figured out track elevations.  I could have done more with grades.  Overall, I am happy with the look of the track as I have elevations for the main and tracks to Fitzy's Staging.

14. Grades are less than 3%.  2" in 8' = 1:42 = 2.4%.


14. Yards have a head shunt.  The main yard has a head shunt equal to the length of train that fits in Fitzy's Staging.  But that is only from one direction.  The opposite direction will run into a small yard at Hart.  It's not perfect, but it isn't an issue until more than 2 operators are working.

15. Passing loops can house the longest foreseeable train.  I wanted single track running.  That's what I've built.  The coal trains can pass at the power station/coal loader or at the the main yard.  All other trains can only pass at the main yard.  So I only need room for a siding the length of trains that fit into Fitzy's Staging.

16. There is scenery between the edge of the layout and track.  Yeh, yeh, yeh.  Sometimes I win, sometimes I don't.  That was the plan, but it's a bit of a challenge when all the turnouts are manually operated.  I need room to reach across and operate a turnout without having tsunami arms destroying buildings and scenery.

17. I have many switching choices.  The main yard offers plenty of scope, 2 small yards, an industry, the coal roads and Fitzy's Staging with the HoG.

18. I’ve planned roads and parking lots.  I would like to say that I did this.  As I said, I would like to say that I did this.

19. I have at least one team track.  It was going to be a caboose track.  I'm flexible here.

20. I’ve planned backdrops. I planned to buy some photo backdrops from a US supplier.  I had a budget of $700 (I saved and didn't buy any locos or rolling stock for about a year), selected a range of backdrops, sat up until some stupid hour and rang the USA.  Guess what?  They didn't take VISA card!  I asked which century they were living in, got a terse reply, hung up and went to bed.  Still no backgrounds.  But I do have pics of what I was going to buy.  I think they do VISA now, but I'm still grumpy about them and unlikely to buy from them.

21. I’ve planned wiring requirements.  I thought that I had done reasonably well.  When I got a couple of Digitrax PM42's from Jim (thanks mate), that meant a re-wire.  Jim made it all work.  Jim's RRampmeter worked well.  We found next to no voltage drop around the layout.  Every piece of track is soldered and powered.  The exception is the facing points with insulating joiners.

Overall, I think that the layout construction rules have been useful and saved some possible mistakes.  I haven't stuck to them 100% (just like the speed limit :-) ), but close enough not to cause grief.

Cheers, to you all and happy modelling.
Peter

Sunday, April 8, 2012


This is a bit like Star Wars - the beginning is in the middle.

When we bought the house, it had the 4m x 5m shed out the back. It was just a tin shed with a concrete slab, roller door and side door.  Standard stuff.  That wasn't what I saw though.  I could see my N Scale empire.  The first 3 weeks after putting the deposit on the house was not restful.  I kept thinking about what I could build and how I would overcome some problems.  The shed was red hot in summer and freezing in winter.  There was no power.  How do I seal around the roller door?  What about insulation?  Air conditioning?  Who's the worlds second worst carpenter?  There must be one or two blokes worse than me!  What about the guy in Queensland that sells all the pre-cut timber for layouts - is that a goer?  I went to work very tired on many days.

Doug and Fitzy were an enormous help to me.  Doug is a great carpenter with a keen eye for detail and Fitzy is terrific at planning and building layouts.  We dug a trench and buried the power in conduit. and pre-wired the cable to the 5 double powerpoints and 8 flouro double light fittings in the shed.  A sparky came along and added a new circuit for the shed and a/c.  We installed timber framing and added insulation and lined the shed.  After 2 years (that's not days, weeks or months!) I finally got someone to install the a/c.

Let's go back to me not being a flash carpenter.  I considered layout height and figured that I should make under the layout storage space finished with cupboard doors.  That was a really cool idea.  The first cost of $2,500 for doors without fittings or other timber to hold the layout off the ground, sent shivers down my spine.  There had to be another way. 

I considered buying shelving from the local 2nd hand furniture store, but nothing matched in height, width, or depth that I wanted.  I kept returning to the store every few weeks to see if anything new had arrived.  Then I saw some steel cabinets with roller shutters.  They were about 900mm (3 feet) high.  That was going to be too low for my needs.  But it still seemed like a good idea.

I returned to the store one day and there were several 1350mm (5' 3") high similar cabinets.  Eureka.  I had a plan.  I ended up buying 15 of those cabinets.  I built the layout on top of the cabinets.  That added another 160mm (5") to the height.  Houston, we have a problem.  I'm only 5'7" (I can't be bothered figuring that out in metric).  If I stood on tip toes, I might be able to see the alignment of the turnouts - might that is.

So I built a false floor 100mm (4") off the slab.  I can see!  I can see!  My carpentry skill had improved and I had the floor down in 2 weekends.  Thanks for your tips Doug.

 It's not really pink - the colour has gone screwy.  The written sheets on the cabinet are my 20 rules for layout construction.  I think that I have kept reasonably well to the rules.
 The cabinets became the storehouse for my modelling bits.
 The a/c is set to 19 degrees C in winter and 23 in summer.  Because it runs 24/7, I found that it doesn't use too much electricity.  I fact when I checked my first account with the a/c running, I didn't notice any difference to the previous period.  I haven't checked since.  Maybe I just don't want to know!
 I solved the problem of sealing around the roller door.  I sold it.  Filled the hole in with the same sheet steel and kept on working.
Kits in the cupboard.  i might even make the time to build them one day.


I thought that I should show you some early concepts for the layout.  In some ways, that was the best fun.  It didn't cost anything and I could even sit in a train and do 'what if' doodles.

An early concept sketch.  I wanted empties out and loaded into the power station.
 

Another early concept sketch.  The 'L' shape in the centre is my switching layout inside the house.  I was considering utilising what was already built and adding on to that.


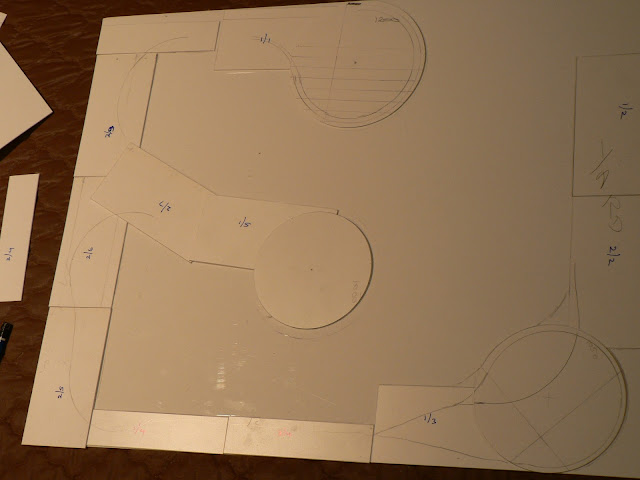
 I got sick of drawing, so I cut out some styrene shapes to match the cupboard size and circles for track radius.  That was much easier to do a 'what if'.


 It was important to have room to move around if more than one operator was driving.

The track plan continued to evolve to what it is now.  I only have one small section to finish to make me happy.

 The main yard

The birds eye view of the main yard.  The Digitrax Zephyr sits in a drawer under the yard.  Three UR91's are also used.  One at either side of the peninsula and the other at Fitzy's Staging.

Fitzy's Staging.  4 tracks at 2 levels to make fat fingers fit to make up trains.

This Roscoe with 3 roads and the elevated main.  I don't have to reach across the main - one of my rules.


 The peninsula will have a scenery divider from the green pin on the left corner to the buildings against the wall.  From this side you will see the power station.  That is the end of the layout.  the other side of the green pin is Roscoe where the coal is unloaded from barges and loaded into the coal trains.
The exposed wiring will be covered.  A soldering iron melts the foam and a trench is formed to bury the wires.


Fitzy's staging with styrene 'don't jump' rails to keep the rolling stock where they belong.

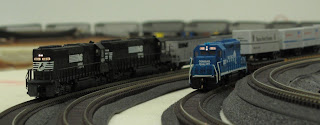
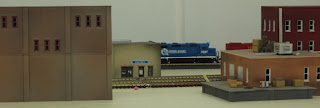
 A couple of running shots.  The buildings are just for show at the moment.


That's all for now.

Happy modeling.
Peter


Saturday, April 7, 2012

Fort Myers Layout

This is what has been happening..... The layout RUNS!

I have spent more time doing rather than talking, hence a long delay between posts. Priorities.

The original track plan changed.  Like all plans, what was considered important on day 1, is less important on day 56 (pick a day).

I had tried to avoid a duck-under, but compromised with a bob-under (a higher duck-under) and that changed the ability of the layout to now be a walk-around. That solved a number of problems.
I wanted 24" radius curves in N Scale.  The exception is the yard where No.4 points have been used.
I wanted continuous running and I wanted a single track main - to make operations easy, enjoyable, logical, (pick what suits you).

A good mate, Fitzy, (see Barcoola blog) offered that there was an opportunity for a staging area. This resulted in 4 tracks (off layout) for trains to be prepared to run interference in the planned coal trains, empty and full, running each direction. This was a great way to improve the operation of the layout. In honour, I've called it Fitzy's Staging (bottom right of layout plan).  Thanks Fitzy.

What is not shown on the track plan is the planned scenery divider.  That will split the peninsula into half and will run diagonally (20 degrees from horizontal on the plan) from the notch in the layout at Fort Myers where the power station will receive the coal loads on one side and the coal is unloaded from river barges at Roscoe.  The aim is to have loads in and empties out of the power station.  The scenery divider being the start/end point of the layout.


Most of the track has been pinned down, some is glued down.  I want to be able to test operational running before locking the track in place.  A downside is that a multi-loco train can move the points slightly.  This then leads to the next train screwing up (that's a technical term) and grinding to a halt.  The 'Hand of God' is required to intervene.  I really hate that.  I fixed that with double sided tape and cured those issues.

One of the aspects that I really wanted to portray was West Brownsville, PA.  I just could not get enough of the street running.  As an aside, I went to Rockhampton, Queensland, Australia, to see the street running there.  It was a public holiday when I arrived and nothing ran!!!  700km each way for nothing......

Back to the layout.
There are opportunities for switching in 4 locations as well as making up trains in the main yard.  There is more then enough planned activity for myself and a couple of other operators.

There are some other friends that need thanking to get the layout to where it is now, listed in contribution order: Doug - he's a good carpenter (not like me), Michael (deceased) who helped in the lining of the shed (if you can read this Michael, an email back to me would be good)  I have a sense of humour; Fitzy, a track planning guru;  and Jim for helping to make sense of DecoderPro and all that makes locos run like they should.

I tried doing this on my own.  I quickly  figured that I don't know enough to make a model railroad work the way it should (and as I would really like it to).  Thanks to all those friends that have assisted.  Every one of you is appreciated for your contribution and skill.

 Digitrax/DecoderPro/Selector Switch/PC setup

I use DecoderPro with a Digitrax Zephyr Extra and Digitrax PR3 computer interface with a selector switch to change between Ops mode or Service mode.  I use Service mode to read back from the decoder in the initial loco setup and Ops mode for speed matching on the fly.  The stopwatch on the phone to check timings using Android app Lapstar Lite Talking Stopwatch.

In preparing to speed match locos, I first considered the max speed for the Passenger, Freight and Coal locos.  Markers beside the track measure 3 and 4 foot points.  I use a terrific scale speed calculator (http://www.mcr5.org/NMRA/articals/speed.htm from the Western Reserve Division, of the National Model Railroad Association, Inc (NMRA)) to calculate the max top speed and then work back in the throttle settings.  Thanks guys for making the effort to put this freely on the web.


 The Western Reserve Division speed calculator webpage

 
Jim's Excel spreadsheet for speed matching locos 

Jim (see http://www.halletcovesouthern.blogspot.com.au/ ) created a spreadsheet to speed match locos for acceleration and deceleration as well as top speed and speed at various throttle settings.  This works really well.  It is time consuming to set up a pair of locos.  The end result is that all the coal locos all run at the same speed for a given throttle setting. The same goes for freight and passenger locos.  The accel and decel rates can also be matched.  This makes for very smoooooth loco consist operation.  There is no fighting as to which loco wants to be first to go or stop.  Good work Jim.

 The overall workbench setup (a switching layout in the background)

The workbench (3x4 feet) folds with the green panel at the front covering the test track, then the entire bench (without the notebook) folds vertically against the switching layout.  This protects the setup while still enabling access to the layout and provides room to move around the room.

 DecoderPro initial screen


Loco details screen


The fun area - for setting and matching loco speeds

Below is a short video showing the adjustment of the top speed using the slide bar.  The write time is reflected in the delay of the loco response to slow to the new top speed.  You can see that some boxes have been checked below the sliders.  These reflect the speed steps 0,1,2,3,4, & 6 on the Zephyr.  On this loco, there is an almost linear speed ramp.  Some locos have different characteristics and are not as linear. 
 

To keep track of the locos that have had the DecoderPro speed matching treatment, I put a small red marker on the jewel case and another on the bottom of the loco fuel tank.  That makes life easier while I have a mixture of locos treated vs untreated.


That's all for now.  Happy modelling.


Monday, June 14, 2010

An early layout plan from 2007


This was drawing created with Corel Draw and saved as a pdf.
The pdf had to be extracted using AXPDF to convert to a blogable (is that a word?) image, (hence the watermark) in the free time before registration and payment.

I wanted to save myself from the perils of a duckunder. That led to limitations on what can be achieved in the space available.